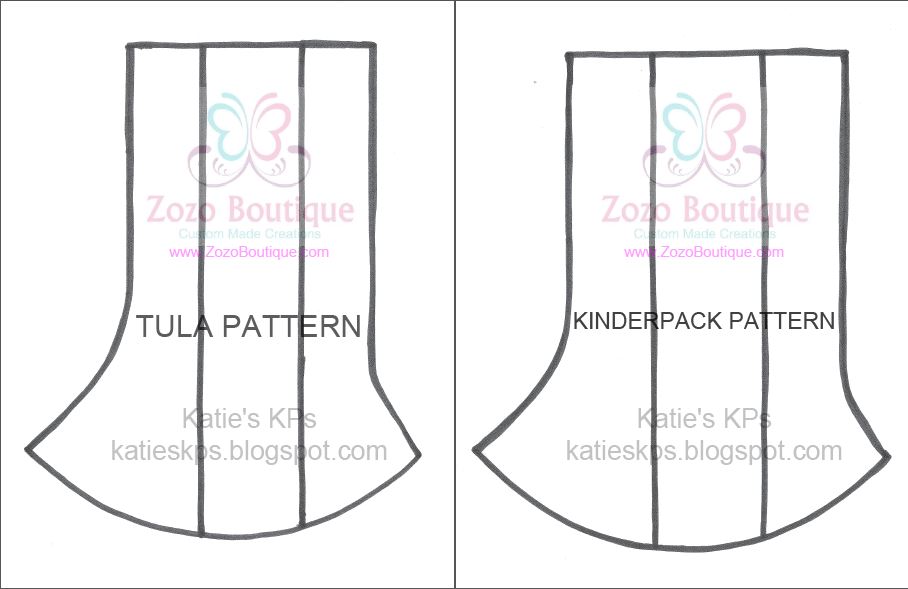
I have had many requests for a darker version of the pattern and help in making these for Tulas or other carriers with narrower straps.
The wait is over! I present to you, new updated patterns for both Tula and Kinderpack!
I am an avid babywearer and especially love my soft structured carriers. I also love to sew and craft. I have decided to marry the two and create lots of fun goodies to go with my carriers! Because I know there are lots of you out there who are crafty like me, I've created some tutorials to help you out. Enjoy!
Tuesday, June 16, 2015
Wednesday, May 27, 2015
Supergirl!
I am so excited that I got a new carrier! Of course it's my favorite, a new Kinderpack! It's not just any new Kinderpack though. This is my one and only unicorn. My I've-wanted-this-since-Dynamic-Duo-Came-Out carrier. SUPERGIRLS!
Embroidered Reach Straps Tutorial
Have you seen some of the adorable reach straps out there and thought to yourself, "I have an embroidery machine. I should be able to do that!"? Well then this tutorial is for you!
Step one is to make your reach straps. Follow the tutorial on the previous post here (pictures coming soon!). You can leave one end of each strap unfinished as it will be inside the embroidered end when you're finished.
Simple Reach Strap Tutorial
Are you having trouble pulling your hood onto your little one's head in a back carry? Do you just want a little something to cute-ify your hood? The most versatile and easily changed accessory is the reach strap! Follow this easy and fast tutorial and you'll be accessorized in no time.
For this super quick and simple tutorial, you will need a strip of fabric that is 2.5" wide by about 19-20" long. If you would like to use two different fabrics or need to utilize space on your fabric differently, you can use two strips that are each 2.5" wide by about 10" long.
Thursday, May 7, 2015
Drool Pads Tips and Tricks
So now that you have made some straight sided drool pads and some curved ones, you kind of have a feel for how things are done. Time to kick it up a notch and make them even better! Here are some tips and tricks to help you make them look more professional and last longer!
1. Clip your corners! Anywhere where you will have a point (where you stopped, picked up the presser foot and turned) will need to be clipped in order to make a sharper corner. Just cut diagonally across the corner, close to the seam line. Don't cut close enough that your stitches are at risk of pulling out, but you want to remove the bulk of this fabric. Here's what the corner looks like before clipping and afterward:
Monday, May 4, 2015
Disneyland Trip Means KP Customization!
We just got back from an amazingly awesome week in Disneyland. I knew before we left that I wanted to do something to customize the Kinderpack that my son would be riding in. His older sister got to dress up in all sorts of princess dresses so it's only fair that he got a costume too, right? I started with the drool pads. I used my embroidery machine to make a set of Mickey hands where my little guy's hands usually end up.
Labels:
Drool Pads,
Hood,
Kinderpack,
Pouch,
Reach Straps,
Slipcover,
Suck Pads
Thursday, April 2, 2015
New Fluff Mail (Shh...It's a Tula!)
I have a new carrier on its way to me. No, it's not another Kinderpack. Try as I might, I just can't snag one in the stockings lately. What I did manage to snag is an Abby's Lane exclusive Tula called Beakers. It uses fabric from the same line as the Elemental Kinderpack (which I also have and love!) and a bright orange canvas. We are all about science in our house so this was a must for me and I am seriously excited to get it!
So what does that mean for this blog? Stay tuned for more tutorials and patterns for Tulas!
There is no way that I could leave my new pretty bare. Tulas have lots of customization options as well, from hoods to drool pads to reach straps, the sky's the limit! They are a bit different from Kinderpacks though, so I want to address some of the unique things about Tula accessories.
Have a specific tutorial you're dying to see made? Leave me a comment and I'll try to get to it first!
Tuesday, March 17, 2015
How Much Fabric Do I Need?
I am often asked how much fabric is needed to make a set of drool pads. That all depends on a few different factors. First, style - a curved style takes up a lot more fabric than straight style. Second, fabric directionality. Some fabrics really don't have a direction to them. Most prints, however, are directional and your pattern pieces will need to be placed in the correct orientation when cutting. Here is how much you will need for the different styles and directions:
Thursday, March 5, 2015
Now Offering Ready-Made Drool Pads!
I am now offering my drool pads for sale! You can check out my etsy shop at zozoboutiques.etsy.com or you can find me on my facebook page at facebook.com/zozoboutiquecreations. I have lots of fabrics on hand and can make them straight or corner, reversible or one pattern, ribbons, ruffles, etc.
I make all of my drool pads with three layers and snap closures just like you see in the tutorials listed below. Send me an email at info@zozoboutique.com or use the contact me form to the right or message me on etsy on facebook and I can set up a custom order just for you!
Current turnaround times are at 10 days or less! I will have an album up on my facebook page shortly with all of my in-stock prints but I can certainly order others.
Monday, February 23, 2015
Corner Drool Pad Tutorial
Okay, so now you've mastered the straight sided drool pads and you want to move on to some curved ones that go around the corners. Here's your supply list:
two coordinating fabrics (about 1/4 of a yard of each)
something absorbent for the inner layer (I used natural cotton batting)
coordinating thread
snaps or velcro for closure
ribbon (optional)
two coordinating fabrics (about 1/4 of a yard of each)
something absorbent for the inner layer (I used natural cotton batting)
coordinating thread
snaps or velcro for closure
ribbon (optional)
Labels:
Drool Pads,
Ergo,
Kinderpack,
Pattern,
Suck Pads,
Tula,
Tutorial
Subscribe to:
Posts (Atom)


